

Return to Home Generator Installation
The generator was purchased with a known problem. The previous owner described it as "putting out too many watts". The output voltage was unstable, varying around 140VAC.
Before beginning any troubleshooting the oil was drained. I always do this when a new engine arrives. There is no way to tell if the oil hasn't been changed for a month, a year, or ever since new. It was clearly overdue when the old stuff came out. The engine was tipped sideways and left for about an hour to fully drain. Fresh oil was put in. Now the troubleshooting and repair can begin.
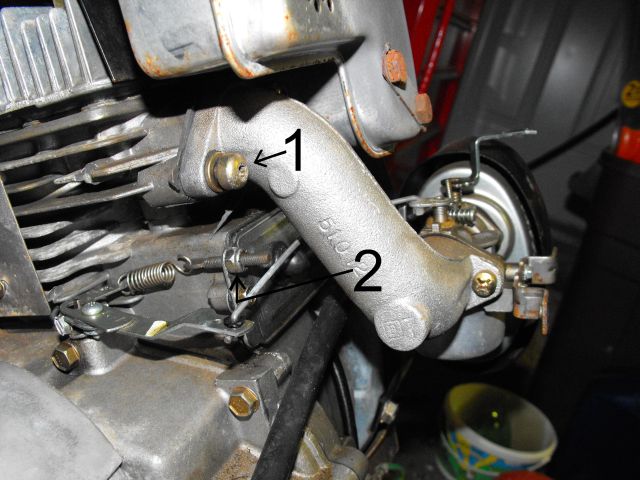
First check was to put in the Kill-A-Watt meter. It showed the output frequency varying from about 58Hz to 68Hz. The governor was unable to regulate the engine speed. While removing the carburetor it seemed loose. Bolt #1 in the picture had broken inside the casing. The gasket was chewed up badly. With such a bad air leak at the intake the engine was out of control.
The broken bolt had to be removed. I was expecting this to be a small battle but it came out with surprising ease. A small hole was drilled and it spun fully into the engine. The screw threads were tapped to clean out any burrs, and then the broken part spun out of the engine with little effort.
New gaskets for both the intake port and the exhaust port were purchased and installed.
The carburetor was dismantled and cleaned while it was off the engine. Just as well to take care of it now rather than tear it down later.
Once the engine started the speed was steady. Nut #2 in the picture is used to adjust tension on the governor spring. After the engine warmed up for a few minutes the nut was adjusted to set the engine at 3600RPM to produce a 60Hz AC output. The output voltage was still much too high and was not adjustable by the AVR control potentiometer. Time to move on to the alternator side.
The muffler is slightly discolored, but doesn't give any indication of high running hours. It seems the generator was not stored correctly and did not receive proper maintenance. Gaskets don't get mangled on their own and bolts seldom just break. There was a hole drilled into the carburetor heat shield to adjust the throttle adjust screw. The entire thing screams save me! The engine repairs are largely just fixing what someone else broke. The previous owner or the person performing repair had no idea how a small engine is supposed to work, and little more about the electrical side.
The Kill-A-Watt P4400 meter can be seen plugged into one of the 120VAC outlets.
The AVR board is part #52795. The green potting material was removed to expose the circuit board. The six 1N4007 rectifier diodes appear ok. The BU931 will be replaced as will the two smaller transistors. A resistor in the lower right corner of the board broke during removal of the potting material. The 2.2uF capacitor and blue potentiometer may have been damaged due to heat and will be replaced.


I mounted the end from another generator with a different AVR board to this one. The output voltage was exactly where it should be, confirming the coils are good and the problem is with the original regulator board.
More updates as the repair progresses...
![]() warrens@ns.REMOVE.sympatico.ca
warrens@ns.REMOVE.sympatico.ca
Please email any comments or suggestions.